Category Archives: G_Tips

用dmalloc调试memory leak的一点使用经验

用c/c++开发的程序,不可避免地会遇到memory leak的问题。在俺们的项目里自己的code基本上已经boost::xxx_ptr了,但是用上第三方的库,总还是得用raw pointer,于是会有各种诡异的memory leak问题。

Dmalloc可谓这方面的神器,它功能很多,不过这里只记录一下怎么用它来找memory leak。

  • 环境: Fedora 11, gcc 4.4.1
  • 准备:
    1. Get dmalloc from http://dmalloc.com/ (latest version 5.5.2)
    2. Patch cxx return value, 如果没有这个patch,dmalloc log里c++的函数地址似乎有问题
    3. make && make install, 注意还需要额外make cxx, threads, install也一样
    4. 设置环境变量,我们只需要打印log信息,所以
    dmalloc runtime -p print-messages
    然后设置相应的环境变量就ok了
  • 调试:
    放两个例子。(相关code在这里 dmalloc_share.tar.gz

    1) 最简单的例子 basic_usage

    $ ./basic_usage
    1361264794: 6: Dumping Chunk Statistics:
    1361264794: 6: basic-block 4096 bytes, alignment 8 bytes
    1361264794: 6: heap address range: 0x7f7840c63000 to 0x7f7840c69000, 24576 bytes
    1361264794: 6:     user blocks: 3 blocks, 11216 bytes (45%)
    1361264794: 6:    admin blocks: 3 blocks, 12288 bytes (50%)
    1361264794: 6:    total blocks: 6 blocks, 24576 bytes
    1361264794: 6: heap checked 0
    1361264794: 6: alloc calls: malloc 4, calloc 0, realloc 0, free 2
    1361264794: 6: alloc calls: recalloc 0, memalign 0, valloc 0
    1361264794: 6: alloc calls: new 0, delete 0
    1361264794: 6:   current memory in use: 2000 bytes (2 pnts)
    1361264794: 6:  total memory allocated: 3600 bytes (4 pnts)
    1361264794: 6:  max in use at one time: 2000 bytes (2 pnts)
    1361264794: 6: max alloced with 1 call: 1200 bytes
    1361264794: 6: max unused memory space: 1072 bytes (34%)
    1361264794: 6: top 10 allocations:
    1361264794: 6:  total-size  count in-use-size  count  source
    1361264794: 6:        1200      1        1200      1  ra=0x400ede
    1361264794: 6:        1200      1           0      0  ra=0x400eb3
    1361264794: 6:         800      1         800      1  ra=0x400e9b
    1361264794: 6:         400      1           0      0  ra=0x400e70
    1361264794: 6:        3600      4        2000      2  Total of 4
    1361264794: 6: Dumping Not-Freed Pointers Changed Since Start:
    1361264794: 6:  not freed: '0x7f7840c63008|s1' (1200 bytes) from 'ra=0x400ede'
    1361264794: 6:  not freed: '0x7f7840c65c08|s1' (800 bytes) from 'ra=0x400e9b'
    1361264794: 6:  total-size  count  source
    1361264794: 6:        1200      1  ra=0x400ede
    1361264794: 6:         800      1  ra=0x400e9b
    1361264794: 6:        2000      2  Total of 2
    1361264794: 6: ending time = 1361264794, elapsed since start = 0:00:00
    

    很明显,地址0x400ede 0x400e9b这两个地方有memory leak,用addr2line看一下:

    $ addr2line -e ./basic_usage 0x400ede
    /xxx/basic_usage.cpp:18
    $ addr2line -e ./basic_usage 0x400e9b
    /xxx/basic_usage.cpp:12
    

    就很清楚了

    2) tricky_usage, 稍微有点tricky的调试方式,稍微解释一下:
    a. 注册SIGHUP和SIGINT的handler;
    b. 收到一次SIGHUP,调用dmalloc_mark(),标志一下当前的内存使用情况;
    c. 再收到一次SIGHUP, 调用dmalloc_log_changed(),记录从上次mark之后的内存变化;
    d. 收到SIGINT,调用 dmalloc_log_unfreed() 打印所有没有被free的内存

    $ ./tricky_usage&  # get the pid
    $ kill -1 pid  # mark, and call testFunc()
    $ kill -1 pid  # log_changed memory
    Asking dmalloc to log changed
    1361264378: 5: Dumping Not-Freed and Freed Pointers Changed Since Start:
    1361264378: 5: not freed: '0x7f67d2384808|s1' (1200 bytes) from 'ra=0x4010ab'
    1361264378: 5: not freed: '0x7f67d2386c08|s1' (800 bytes) from 'ra=0x40105b'
    1361264378: 5: freed: '0x7f67d2389e08|s2' (400 bytes) from 'ra=0x401046'
    1361264378: 5: total-size count source
    1361264378: 5: 1200 1 ra=0x4010ab
    1361264378: 5: 800 1 ra=0x40105b
    1361264378: 5: 400 1 ra=0x401046
    1361264378: 5: 2400 3 Total of 3
    

    注意”not freed”和”freed”,很明显吧 🙂
    多kill -1几次,可以观察到每一次freedAndNew这个变量会在下一次被free掉,这个并不算leak,真正的leak是notFreed这个变量。

    然后kill -2看看结果。

    $ kill -2 pid  # log all unfreed variables
    1361264409: 18: dumping the unfreed pointers
    1361264409: 18: Dumping Not-Freed Pointers Changed Since Start:
    1361264409: 18: not freed: '0x7f67d2383808|s1' (1200 bytes) from 'ra=0x4010ab'
    1361264409: 18: not freed: '0x7f67d2386408|s1' (800 bytes) from 'ra=0x40105b'
    1361264409: 18: not freed: '0x7f67d2386808|s1' (800 bytes) from 'ra=0x40105b'
    1361264409: 18: not freed: '0x7f67d2386c08|s1' (800 bytes) from 'ra=0x40105b'
    1361264409: 18: total-size count source
    1361264409: 18: 2400 3 ra=0x40105b
    1361264409: 18: 1200 1 ra=0x4010ab
    1361264409: 18: 3600 4 Total of 2
    

    不解释了~
    想真正杀掉这个测试进程,kill -9吧

    总结:
    1) 设置dmalloc的环境变量,link libdmallocxxx,运行完程序会有dmalloc的分析数据;
    2) dmalloc_mark() 和 dmalloc_log_changed() 可以用来分析某一次事件或一段时间内的内存变化情况;
    3) dmalloc_log_unfreed() 可以打印当前所有没有free掉的变量

Share

在一根网线上承载两路网络

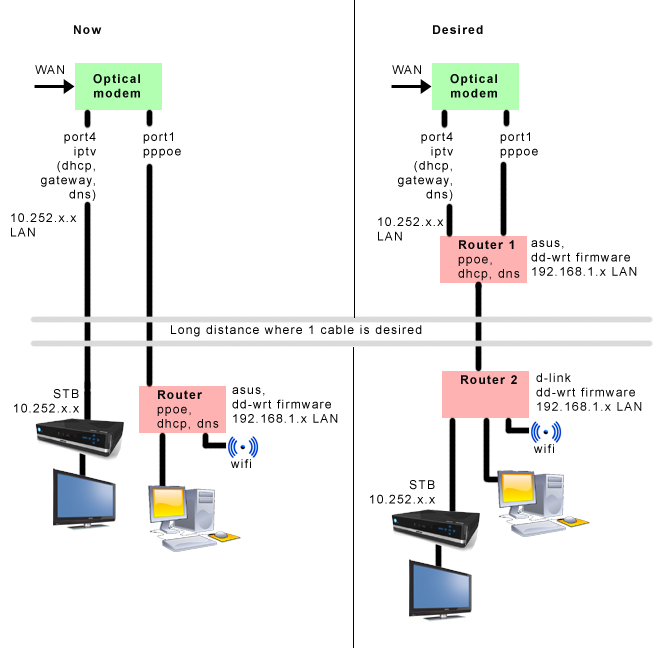
光纤入户的时候只到弱电箱,光猫、路由器放在弱电箱里,而客厅只有一个网口,也就是说,从弱电箱到客厅只有一根网线,如何在客厅同时接IPTV和PS3?
用wifi接PS3当然可以,不过当需要用DLNA播高清流的时候PS3的wifi就亚历山大了。
因此只考虑有线,如何搞定这个网络连接?
StackOverflow上有人问了同样的问题(http://stackoverflow.com/questions/9428267/lan-setup-internet-and-iptv-separate-lans-over-one-cable),但因为偏题被close了,偷张图来描述问题:
The desired network

经过热烈讨论,有这么几种方案:

方案一:Router1和Router2都用hub代替,关闭光猫的dhcp,网络设备都用静态IP,这样应该可以和IPTV互不干扰(没试过,理论上可行)。但是这样移动设备也需要设静态IP,很麻烦,放弃;

方案二:StackOverflow上的回答,Router1和Router2都用支持VLAN的交换机,用划分VLAN的方式隔离IPTV的网络与PS3的ADSL网络。这个有点复杂(没自己配过VLAN),而且支持VLAN的交换机都比较贵,放弃;

方案三:用电力线适配器组建另一路网络。就是说,墙上的网线只用来接IPTV;在弱电箱和客厅的墙上各接一个电力线适配器,组成另一路单独的网络接PS3。很好很强大,不过电力线适配器小贵(一对至少RMB200+)。如果没有更好的方案,这个可以考虑。

方案四:Google后发现,RJ45接口一共8pin,10/100M的网络只用了其中的4根pin,因此有了”Ethernet Splitter“这么一个东东,把一根8pin的网线变成两个4pin的网络,原理在此(注意番墙)http://www.ethernetsplittersite.com/
这玩意儿在amazon上有现成的卖,不过在淘宝上居然没找到,因此继续Google发现有国外玩家贴了如何自制这个分离器的图:http://www.instructables.com/id/How-to-make-your-own-Ethernet-%22splitter%22/
原理本来就很简单,所以做起来并不难,零件也不算贵,因此,就用这个方案了!

所需零件:
小段网线*2
水晶头*2 (随便找根不用的网线,剪两段下来就OK了)
水晶头母座*4 (五金店没找到,京东上买,共48元)
其它辅助工具:
万用表、网线测试仪、镊子 (找同事、公司物业借)

根据上面的自制分离器的图,很容易就搞定了,贴个图:

在家测试——光猫的IPTV和LAN接分离器的两个口,然后两根网线用一个网络直通口连起来,另一个分离器的一个口接机顶盒,另一个口接电脑——IPTV正常,电脑上网正常,搞定!

p.s. 此方法只针对10/100M网络有效,千兆网用足了8个pin,因此不适用;
p.p.s. 目前只是简单测试了IPTV和上网,没试过高带宽的传输,不知道会不会有干扰的问题,假如将来在实际使用中遇到问题,会再写篇博客汇报。

Share

Android上的psf播放器 MinePsfPlayer

很久以前就想在Android上做一个psf的播放器,耽搁了许久,现在总算搞出了第一个版本。

稍微介绍一下历史:
1) 最早是基于sexypsf library (http://projects.raphnet.net/#sexypsf),在PSP上写了一个能播放psf音乐的demo;不过后来不知道什么原因,没有继续做下去;
2) 后来发现了Audacious,一个从XMMS派生出来的开源播放器,里面有psf plugin,从code里看,psf的解码也是基于sexypsf的,但里面还包含了psf2的lib,在linux上工作良好;
3) 于是用了这个lib,在SDL库的基础上写了一个demo,可以在Windows/Linux上可以播放psf的demo;
4) Android出来之后,就想在上面写个psf播放器,不过刚开始没有NDK,感觉搞不定;
5) NDK出来之后,终于可以在android上写一个播放psf的demo了,在模拟器上跑,效果惨不忍睹,解码得太慢了;当时还没有Android手机,以为性能会有问题,作罢;
6) 买了Milestone之后,在实际的手机上跑了一下,发现性能上基本上没问题,但是有各种问题(实际上是code里的bug),当时在搞短信震动的app,psf的播放又往后拖了很久;
7) 现在终于搞定了psf的播放器!(在手机上听各PS经典游戏的原声,内牛满面啊)

TODO: 最高优先级的当然是PSF2的播放,这样就可以在手机上听FFX的音乐了,但愿不会拖太久。。。

总之,欢迎下载~
https://play.google.com/store/apps/details?id=com.mine.psfplayer
MinePsfPlayer_GooglePlay

Share

关于C++里”Pure Virtual Function Called”的问题

前几天项目里遇到一个crash的bug,直接原因code执行时报了一个”pure virtual function called!”的错,然后挂了。
直觉上来说pure virtual function是在编译阶段就会报错的,不应该出现这样的问题。但问题既然出现了,必然是某个地方真的调用到了纯虚函数。这个问题挺有趣,搞定之后决定记录下来。

Google之,第一个结果就是最完美地解释这个问题产生的原因的。http://www.artima.com/cppsource/pure_virtual.html 不过这里稍微再解释一下。

产生这个问题的原因主要有二:
1) 在基类的构造函数里调用了纯虚函数,这个很容易理解,很显然俺们的项目里不会有这种低级错误,否则一跑就crash… 总之,这个错误就忽略了;
2) 某个继承类的对象调用一个虚函数时,这个对象已经被析构了,这时可能是内存错误,也可能是pure virtual function called

具体点,上code:

class Base
{
public:
  virtual ~Base() { sleep(1); }
  virtual void DoIt() const = 0;
};

class Derived : public Base
{
public:
  virtual ~Derived() { /*sleep(1);*/ }
  virtual void DoIt() const {
    std::cout<<"Derived::DoIt()"<<std::endl;
  }
};

void* Task(void* const p)
{
  const Base * const b = reinterpret_cast<const Base*>(p);
  while (1) {b->DoIt(); usleep(50000);}
  return NULL;
}

int main()
{
  pthread_t t;
  Derived * const b = new Derived();
  pthread_create(&t, NULL, Task, (void*)b);

  delete b;
  pthread_join(t, NULL);
}

执行结果(gcc版本4.6.1):

pure virtual method called
terminate called without an active exception
Aborted

稍微解释一下:
1) Base的析构函数里会sleep 1秒;
2) 线程里不停地调用 b->DoIt()函数;
3) 在delete b之后,继承的类Derived已经析构,而Base还存在,因此这时去调用DoIt()时就出现了pure virtual method called的error

如果想做backtrace,可以实现自己的handler。在gcc里,这个函数是__cxa_pure_virtual,自己实现一份

extern "C"
void __cxa_pure_virtual () {
  std::cout<<"In My Pure Virtual Call!"<<std::endl;
}

执行结果是:

In My Pure Virtual Call!
...

用gdb加个断点,看backtrace就搞定了。

Share

[Android Dev] Gmail OAuth (2)

这一部分主要介绍如何使用已获得的Access Token去获取Gmail以及计算未读邮件的数量。

1. 从上一篇博客里获得的AccessToken以及Secret,生成OAuthConsumer,非常简单。

CommonsHttpOAuthConsumer consumer =
  new CommonsHttpOAuthConsumer("anonymous", "anonymous");
consumer.setTokenWithSecret(token, secret);

2. Gmail提供了RSS Feed,只需要使用token取得RSS Feed,就拿到了Gmail的内容。其中:
https://mail.google.com/mail/feed/atom/ 对应Inbox里的未读邮件
https://mail.google.com/mail/feed/atom/unread/ 对应所有的未读邮件
https://mail.google.com/mail/feed/atom/labelname/ 对应某个label的未读邮件
我只需要取得用户的Inbox的未读邮件,因此code是这样的:

HttpGet request = new HttpGet("https://mail.google.com/mail/feed/atom/");
// sign the request
try {
  consumer.sign(request);
} catch (Exception e) {
  e.printStackTrace();
}
// send the request
HttpClient httpClient = new DefaultHttpClient();
org.apache.http.HttpResponse response;
try {
  response = httpClient.execute(request);
  feedString = read(response.getEntity().getContent());
} catch (Exception e) {
  e.printStackTrace();
}

feedString里就保存了Google返回的feed的内容。而函数read是为了把response里的内容读出来生成String. 这个是从网上抄来的…

private static String read(InputStream in) throws IOException {
  StringBuilder sb = new StringBuilder();
  BufferedReader r = new BufferedReader(new InputStreamReader(in), 1000);
  for (String line = r.readLine(); line != null; line = r.readLine()) {
    sb.append(line);
  }
  in.close();
  return sb.toString();
}

3. 有了feed,就剩下计算unread count的工作了。这分成两部分。
i) 从String生成XML Document,其实是一个DOM tree;
ii) 在XML Document里parse数据,取得unread count.
关于i) 也是网上有相应的code:

private static Document XMLfromString(String xml){
  Document doc = null;
  DocumentBuilderFactory dbf = DocumentBuilderFactory.newInstance();
  try {
    DocumentBuilder db = dbf.newDocumentBuilder();
    InputSource is = new InputSource();
    is.setCharacterStream(new StringReader(xml));
    doc = db.parse(is);
  } catch (ParserConfigurationException e) {
  // XML parse error
  return null;
  } catch (SAXException e) {
  // Wrong XML file structure
  return null;
  } catch (IOException e) {
  //I/O exeption
  return null;
  }
  return doc;
}

关于ii) Gmail的一个个邮件是放在一个个entry里的,所以只需要parse entry就行了。

NodeList nodes = feedDoc.getElementsByTagName("entry");
unread_count = nodes.getLength();

这就搞定了未读邮件数量的计算。

4. 虽然正常情况下都没问题,但是假如用户改了密码,token就无效了,应该检测这种情况,然后让用户重新进行authenticate。虽然这不常见,但也得处理。
假如Token变得无效,Gmail会返回一个显示Unauthorized的网页。因此最简单的方法是通过字符串判断. 注意如果是正常的feed,string是以<?xml为开头的,而如果是unauthorized的网页,就以<HTML>开头。

private static boolean verifyValid(String doc) {
  return !(doc.startsWith("<HTML>") && doc.contains("<TITLE>Unauthorized"));
}

这样就解决了。

Q.E.D.

Share