
WireGuard这个VPN最近有点热门,搜了一下,大都在讲点对点VPN,Android上的配置基本上都用AzireVPN已经配置好的config,如何在自己的VPS搭建,并给自己的Android用,稍微摸索了一下,记录一下。
服务器端的配置
在VPS上的配置很简单,按照网上的主流的教程配置就好,比如说Linode上的文章写得很清楚了,不过其中漏掉了一点点东西(ipv4 forwarding),这里放一个完整的步骤。
安装
- 依赖linux-headers
sudo apt install linux-headers-$(uname -r)
- 安装WireGuard
sudo add-apt-repository ppa:wireguard/wireguard
sudo apt-get install wireguard
配置
- 创建key
umask 077
wg genkey | tee privatekey | wg pubkey > publickey
- 编辑config文件
/etc/wireguard/wg0.conf,具体见注释[Interface] Address = 192.168.2.1/24 # VPN server自己的地址,可以改成任意的内网地址 Address = fd86:ea04:1115::1/64 # VPN server自己的ipv6的地址(可选) SaveConfig = true # 设为true之后,每次重启服务(stop service时)都会自动保存config # 以下是重点: 当服务启动时,通过iptables配置wg0来的流量forward到eth0 # 如果你的device不是eth0而是别的名字,把下面的eth0改成别的。 # 当服务停止的时候,删除相关的iptables规则 PostUp = iptables -A FORWARD -i wg0 -j ACCEPT; iptables -t nat -A POSTROUTING -o eth0 -j MASQUERADE; ip6tables -A FORWARD -i wg0 -j ACCEPT; ip6tables -t nat -A POSTROUTING -o eth0 -j MASQUERADE PostDown = iptables -D FORWARD -i wg0 -j ACCEPT; iptables -t nat -D POSTROUTING -o eth0 -j MASQUERADE; ip6tables -D FORWARD -i wg0 -j ACCEPT; ip6tables -t nat -D POSTROUTING -o eth0 -j MASQUERADE ListenPort = 10443 # 随便选一个空闲的端口 PrivateKey = <private-key> #在上一步里生成的privatekey的内容
这样我们就创建好了一个wg0的WireGurad网络的配置。
启用服务
- 手动开启、关闭
wg0的网络:wg-quick up wg0 wg-quick down wg0
- 通过
systemd来启用这个service,这样系统重新启动时这个服务也会自动启动systemctl enable wg-quick@wg0
额外的配置
为了让VPN能正常工作,需要enable ipv4的ip_forward功能:
sysctl -w net.ipv4.ip_forward=1
这样,服务端一开始的配置就弄好了。
手机端的配置
接下来在Android上配置WireGuard。
安装
直接在PlayStore或者F-Droid上下载WireGuard。
配置
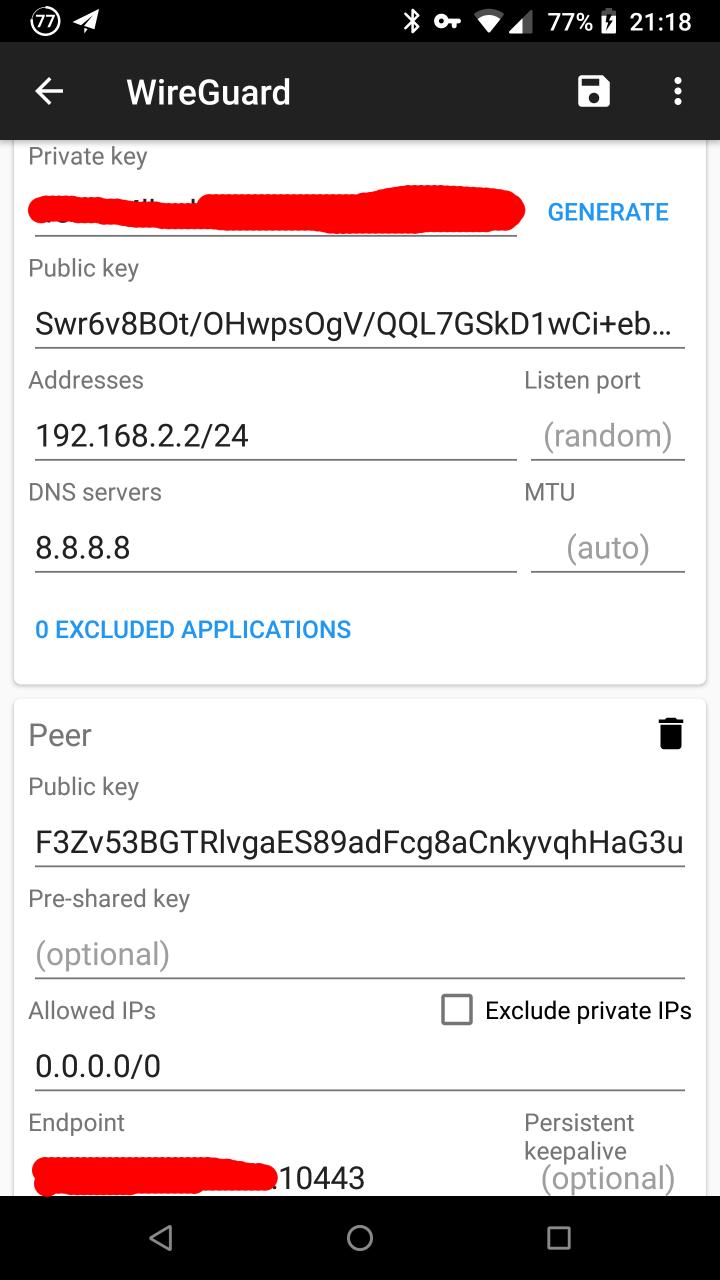
如下图
-
- Name: 自己起个名字
- 点击
GENERATE,它会自动生成Private/Public Key
点击Public key,它会把public key复制到剪贴版,之后要用到。 - Addresses: 填跟服务器端的配置里同样网段的IP,比如说
192.168.2.2/24 - DNS: 我填了
8.8.8.8,这个应该是可选的 - 添加一个Peer,在Peer里:
- Public key: 填服务器端生成的public key
- Allowed IPs: 填
0.0.0.0/0,允许所有IP(这个很重要,否则即使连上了VPN,也无法访问别的网站) - Endpoint: 填服务器的IP:端口(比如上面服务端的配置
10443)
这样手机端的配置也好了。
服务端添加client
再次回到服务器,添加这个手机的public key
# android-public-key填手机的WireGuard里生成的public key
sudo wg set wg0 peer <android-public-key> allowed-ips 192.168.2.2/24
这样,所有的配置都弄好了,在手机上打开WireGuard,启动刚才配置好的服务,enjoy the freedom
后话
总体来说,WireGuard的配置相比别的要简单多了,而且速度确实很快。
不过,有几个问题:
- 目前的Android的WireGuard的功能很有限,只有简单的Exclude apps来排除不需要用的app。如果加上了GFWList,应该会实用很多。
- 虽然没有看过code,但是从原理上来说,这个VPN应该还是很容易从协议层面被GFW识别,如果没有混淆,GFW只要愿意,很容易定点封IP。
综上,WireGuard适合喜欢尝鲜的朋友,作为日常的翻墙工具,还需要国人在目前的基础上增加工能。GFWList应该好办,能不能混淆,需要去看看白皮书了。。。
